日本語 / English
CyPria is an application that allows you to print pictures taken by camera, photos in gallery, and notepad text directly from a Wi-Fi enabled printer.
In this section, the integration of Other Applications is explained.
2. Other Application Integration
2.1 Printing from Standard Applications (Camera / Gallery)
2.2 Printing from Integrated 3rd Party Applications
2.3 Registering / Sorting / Deleting History of Other Applications in the Launcher
2.4 Switching Between Each Application’s Individual Print Settings
For basic application functions, please refer to “1. Basic Functions”.

Printing from Camera (Standard App)
- Touch “Camera” located under Standard Applications at the CyPria – Launcher Screen.
- At the Camera Screen, touch the camera icon to take a picture.
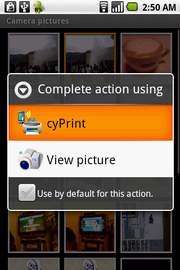
- Touch the thumbnail image that you want to print and then touch “CyPria” from the “Application Selection” menu.
- Touch the printer icon at the CyPria – Print Settings Screen.
<< Note >>
・If no printer has been set for printing, the printer icon will be deactivated. To activate the printer icon, please follow the directions at 1.2 Automatically Finding Wi-Fi Connected Printers. Once a printer has been set and the icon activated, please touch the printer icon.
-
Touch “OK” at the “Print Succeeded” message.
<< Note >>
・The message will close and you will return to the Camera Screen.
Printing from Gallery (Standard App)
- Touch “Gallery” located under Standard Applications at the CyPria – Launcher Screen.
- At the Gallery Screen, touch an album and the pictures will be displayed.
- Touch the thumbnail image that you want to print and then touch “CyPria” from the “Application Selection” menu.
- Touch the printer icon at the CyPria – Print Settings Screen.
<< Note >>
・If no printer has been set for printing, the printer icon will be deactivated. To activate the printer icon, please follow the directions at 1.2 Automatically Finding Wi-Fi Connected Printers. Once a printer has been set and the icon activated, please touch the printer icon.
-
Touch “OK” at the “Print Succeeded” message.
<< Note >>
・The message will close and you will return to the Gallery Screen.
You can use CyPria to print from 3rd Party Applications that are equipped with a “Share” or “View” menu for images and a “Share” menu for text by selecting “CyPria” from these menus.
Here, we will use “PicSay Free Edition Version 1.2.8” as an example to explain how to print from integrated 3rd Party Applications.
Printing from PicSay
- Touch the PicSay icon located in the “Application” tab of the Home Screen.
- Press “Menu” and then touch “Documents”.
- Touch the thumbnail image that you want to print.
- Once the image is displayed on the whole screen, press “Menu” and then touch “Export”.
- Touch “CyPria” displayed under “Share picture via” at the Export Picture Screen.
- Touch the printer icon at the CyPria – Print Settings Screen.
<< Note >>
・If no printer has been set for printing, the printer icon will be deactivated. To activate the printer icon, please follow the directions at 1.2 Automatically Finding Wi-Fi Connected Printers. Once a printer has been set and the icon activated, please touch the printer icon. - Touch “OK” at the “Print Succeeded” message.
<< Note >>
・The message will close and you will return to the Gallery Screen.


<< Note >>
- When CyPria is set to register 3rd Party Applications automatically and you use the integrated CyPria functionality from a 3rd Party Application, the application’s history (the time it was used, the number of times used, the name of the print settings that were used) is automatically recorded. In the cyPrint – Launcher Screen, the name of the 3rd Party Application and the name of the print setting that was used when you printed from the application will be displayed under Other Applications.
- In the CyPria – Launcher Screen, the name of the last print setting used with the 3rd Party Application will be displayed to the right side of the application’s name.


Automatically Registering 3rd Party Applications to the Launcher
- Press “Menu” at the CyPria – Launcher Screen and then touch “Launcher Settings”.
- Touch either “On” or “Off” under Auto Register located at the CyPria – Launcher Settings Screen.
<< Note >>
- By default, Auto Register is set to “On”.
-
When Auto Register is set to “On” and you use the integrated CyPria functionality from a 3rd Party Application, the application’s history (the time it was
used, the number of times used, the name of the print settings that were used) is automatically recorded. In the cyPrint – Launcher Screen, the name of the 3rd Party Application and the name
of the print setting that was used when you printed from the application will be displayed under Other Applications.
Sorting 3rd Party Applications
- Press "Menu" at the CyPria – Launcher Screen and then touch "Launcher Settings".
- Touch either “Last used” or “Used times” under Sort By located at the CyPria – Launcher Settings Screen.
<< Note >>
- By default, Sort By is set to “Last used”.
- When set to “Last used”, integrated 3rd Party Applications located under Other Applications will be listed according to the last time cyPrint was used with that application.
- When set to “Used times”, integrated 3rd Party Applications located under Other Applications will be listed according to the number of times CyPria was used with that application.
Deleting the History of 3rd Party Applications
- Press “Menu” at the CyPria – Launcher Screen and then touch “Launcher Settings”.
- Touch “Delete” or “Delete all” after putting a check next to the 3rd Party Application under Delete History located at the CyPria – Launcher Settings Screen.
<< Note >>
- By default, no 3rd Party Applications have been registered, so no list will appear under “Delete history”.
- ”Delete” will be deactivated until at least one 3rd Party Application is given a check.
- Touching “Delete” will delete the entire history of the 3rd Party Application with the checkmark and its name will no longer appear under Other Applications at the cyPrint –Launcher Screen.
- Touching “Delete all” will delete the entire history of all 3rd Party Applications and their names will no longer appear under Other Applications at the cyPrint –Launcher Screen.
At the CyPria – Launcher Screen, the last print settings used by each application is shown to the right of that application’s name. The next time you print with an application, the settings
will automatically switch to those shown to the right of its name.
Here, we will startup “PicSay Free Edition Version 1.2.8” from the CyPria – Launcher Screen as an example to explain how the print settings automatically switch.
Starting Up PicSay from the Launcher and Automatically Switching Print Settings
- Touch the PicSay icon under Other Applications located at the CyPria – Launcher Screen.
- Press “Menu” and then touch “Documents”.
- Touch the thumbnail image that you want to print.
- Once the image is displayed on the whole screen, press “Menu” and then touch “Export”.
-
Touch “CyPria” displayed under “Share picture via” at the Export Picture Screen.
<< Note >>
・The print setting name at the CyPria – Print Settings Screen automatically changed to the name shown to the right of PicSay at the cyPrint – Launcher Screen.
- Touch the print setting name on the CyPria – Print Settings Screen.
- From the print setting name selection menu, touch the name of the new print setting you want to use.
-
Touch the printer icon at the CyPria – Print Settings Screen.
<< Note >>
・If no printer has been set for printing, the printer icon will be deactivated. To activate the printer icon, please follow the directions at 1.2 Automatically Finding Wi-Fi Connected Printers. Once a printer has been set and the icon activated, please touch the printer icon.
-
Touch “OK” at the “Print Succeeded” message.
<< Note >>
・The message will close and you will return to the PicSay Screen.
- Press “Return” several times until you are back at the CyPria – Launcher Screen.
-
<< Note >>
- The new print setting name that we did in Step 7 is now shown to the right of PicSay at the CyPria – Launcher Screen. From now on, whenever we startup PicSay from the CyPria – Launcher Screen, it will automatically switch to this print setting.
- If we had not touched the printer icon in Step 8 and returned to the CyPria – Launcher Screen from cyPrint – Print Settings Screen, the name of the print settings shown to the right of PicSay would have remained the same.
