日本語 / English
CyPria is an application that allows you to print pictures taken by camera, photos in galleries, and notepad text directly from a Wi-Fi enabled printer.
In this section, the basics of CyPria are explained.
1.2 Automatically Finding Wi-Fi Connected Printers
1.3 Adding / Selecting / Changing / Deleting Print Settings
1.4 Printing Directly from CyPria Applications (Camera / Note)
For integrated application functions, please refer to "2. Other Application Integration".
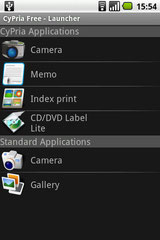
Opening CyPria
- Touch the CyPria icon located in the “Application” tab on the Home Screen.
<< Note >>
・The application explanation screen is displayed, followed by the CyPria – Launcher Screen a few seconds later.
・Depending on the version you are using, the days left in your trial will be displayed.
Closing CyPria
- Press “Home” or “Return” on the CyPria – Launcher Screen.


Opening the Print Settings Screen
- Press "Menu" on the CyPriat – Launcher Screen and then touch "Print Settings".
<< Note >>
・This screen appears when you print from an application capable of printing (cyPrint Applications, Standard Applications, 3rd Party Applications).
Selecting a Printer from the Printer Finder Screen

- Touch the finder icon on the CyPria – Print Settings Screen.
<< Note >>
・The CyPria – Printer Finder Screen is displayed and Wi-Fi connected printers are detected automatically. The names of the printers that are found are added and displayed in the list.
* Depending on your network, this process may take 30 seconds to several minutes to complete.
- On the CyPria – Printer Finder Screen, select the name of the printer you want to use and then press the “OK” button.
<< Note >>
・Pressing the “OK” or “Return” return button during the detection process will interrupt it.
・The name of the selected printer will be set in the CyPria –Printer Settings Screen.
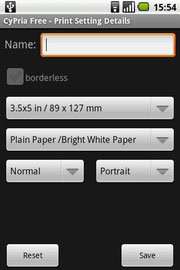
Adding Print Settings at the Print Settings Screen
- Press “Menu” from the CyPria – Launcher Screen and then touch “Print Settings”.
<< Note >>
・This screen appears when you print from an application capable of printing.
- Press “Menu” at the CyPria – Print Setting Details Screen and then touch “Add”.
- Enter in a name for the setting at the CyPria – Print Setting Details Screen.
- Select the paper size, paper type, orientation, print quality by touching each item and selecting the setting you want from the list.
- Touch “Save” at the CyPria – Print Setting Details Screen to save your settings.
<< Note >>
・The name of the setting you added will be displayed in the CyPria – Print Setting Screen.
Selecting Print Settings at the Print Settings Screen
- Touch “Print Setting Name” at the CyPria – Print Setting Screen.
- Select the name of the print setting you want to use from the print setting selection list.
<< Note >>
・Default print settings will display the name “Default Print Settings”.
Changing Print Settings at the Print Setting Details Screen
- Press “Menu” at the CyPria – Print Settings Screen and then touch “Setting Details”.
- Select the paper size, paper type, orientation, print quality by touching each item and selecting the setting you want from the list.
-
Touch “Save” at the CyPria – Print Setting Details Screen to save your settings.
<< Note >>
・All setting names except for “Default Print Settings” can be changed.
・The name of the setting you added will be displayed in the CyPria – Print Setting Screen.

Deleting Print Settings at the Print Setting Screen
- Select any print setting name except for “Default Print Settings” at the cyPrint – Print Settings Screen.
- Press “Menu” and then touch “Delete”.
- Touch “Yes” at the deletion confirmation screen.
<< Note >>
・If the setting name is “Default Print Settings”, the “Delete” menu will not be displayed.
Printing Directly from Camera (cyPrint App)
- Touch “Camera” located under cyPrint Applications at the cyPrint – Launcher Screen.
- At the Camera Screen, touch the camera icon to take a picture.
- Confirm the image at the confirmation screen and then touch the printer icon.
<< Note >>
・If you press “Return”, you will return to the Camera Screen and will be able to take another picture.
- Touch either “Yes” or “No” at the “Save Before Printing?” message.
<< Note >>
・If you chose “No”, the image will not be saved.
- Touch the printer icon at the cyPrint – Print Settings Screen.
<< Note >>
・If no printer has been set for printing, the printer icon will be deactivated. To activate the printer icon, please follow the directions at 1.2 Automatically Finding Wi-Fi Connected Printers. Once a printer has been set and the icon activated, please touch the printer icon.
- Touch “OK” at the “Print Succeeded” message.
<< Note >>
・The message will close and you will return to the Camera Screen.

Printing Directly from Note (cyPrint App)
- Touch “Note” located under cyPrint Applications at the cyPrint – Launcher Screen.
- Press “Menu” at the cyPrint – Note Screen and then touch “New”.
- Enter in a title and some text at the cyPrint – Note Edit Screen.
- Press “Menu and then touch “Print”.
<< Note >>
・Even if you press “Menu” then touch “Share” and then select cyPrint form “Application Selection”, you can still print. - Touch the printer icon at the cyPrint – Print Settings Screen.
<< Note >>
・If no printer has been set for printing, the printer icon will be deactivated. To activate the printer icon, please follow the directions at 1.2 Automatically Finding Wi-Fi Connected Printers. Once a printer has been set and the icon activated, please touch the printer icon.
- Touch “OK” at the “Print Succeeded” message.
<< Note >>
・The message will close and you will return to the Note Screen.


